A Bird Bath To Last Forever
I wanted a birdbath that would last a long time and that would go with my natural backyard. I don’t really want a gaudy birdbath that was made in China. I wanted something more natural-looking and something that would last a long time.
Enter a rock birdbath. Headbanging and loud music, not included.
I originally got this technique from an amazing YouTuber The Samurai Carpenter. Check him out on YouTube, as he makes some killer stuff. As he made a sink out of a stone and well I didn’t want a stone sink, I did need a birdbath. He also uses a big concrete saw that uses water to keep the dust down. I didn’t want to buy one of these or even rent one, so I used what I did have, an angle grinder and it performed well.
You can get a better understanding of how this works by watching the below video.
Benefits Of A Bird Bath
Birds really help me out in my garden. As they are constantly flying in and out of it, in search of bugs and worms. Thus allowing me to have to worry less about them eating my vegetables. As I have many birds with nests around my house and the voracious appetite of the growing baby birds they require constant feeding. A birdbath will make the birds happy and content to stay around your area reducing pests that are in the garden.
If you have a garden, a birdbath will surely bring in more birds. They are also more likely to leave your tomatoes alone too, as they will peck at tomatoes when no water is present. As they do this for water. I have never had a single tomato pecked by a bird in my garden since having a birdbath. Plus it is an enjoyment watching the many different types of birds come and go to the bath.
My Experience
It only took a couple of hours to make this birdbath that will last many years long after I am gone.
I am usually pretty self-deprecating, I am constantly working on improving this in myself, but when working on my stone birdbath I was plagued by the thought of what if the birds won’t like it or even use it. I kept thinking I could just turn it over and hide it if the birds didn’t like it. Or if it didn’t turn out well.
Well, well, well.
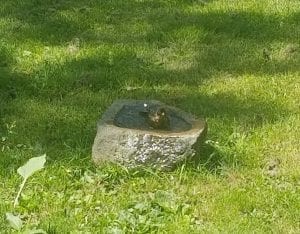
It took no more than ten minutes after I finished it and put water in it than a robin flew on the rim took a drink of water and then hopped in and took a bath. I was relieved and quite pleased with this. The birds love it and have had many different types of birds use it over the last couple of years. Even a crow.
Safety First, People!
It is super important to overemphasize the need for proper safety equipment when grinding any type of stone and just working with any tools. Be safe and use protection.
Do not grind any stone or concrete without proper protection ever!!! Serious damage to your lungs could happen if you choose to avoid using protection.
The dust from grinding rocks is extremely bad for your lungs. This can cause problems immediately or down the road when you’re older. As was the case for my late father-in-law, who by trade was an owner of a monument shop and routinely worked around rock dust, sandblasting names and dates into headstones with little to no personal protective equipment. He developed Silicosis later in life as well as being diagnosed with COPD. Struggling to breathe is no way to live and especially to die.
So, I have personally witnessed the horrible effects this can have on someone. SO, USE A RESPIRATOR!!!
Perform the grinding outside whenever possible and with adequate ventilation. You could even have a fan at your back or at least the wind. This is so the dust will fly away from you and your workspace.
Tools That You’ll Need
A good quality Respirator
1 Pair of Safety Glasses
Cold chisel
A Hammer
A black Sharpie
Safety Gloves
1 Angle Grinder (either 4″ or larger)
Diamond Cup Grinding Wheel – This is for smoothing the surface of rock after using the Diamond Saw Blade.
2 – Diamond Saw Blade (usually labeled for Masonry) That will fit whatever size angle grinder you have.
Oh…and let’s not forget a suitable rock.
Some Thoughts On Choosing The Right Rock
Type
You’ll want a hard rock with tight grains. Granite is a great stone to make birdbaths out of. I haven’t made many birdbaths, just one, but I am sure a wide range of stones could be used.
Just make sure to turn the stone over and try to make sure there are no cracks that are visible. These cracks could end up being a problem for you, by either breaking or just not holding the water.
Size
You want to find a rock that you can pick up and move by yourself or with a friend. Or if you have the proper equipment, I guess it could be even larger. Rocks are quite heavy. (oh really…Captain Obvious!) So get a gauge of how heavy by trying to pick it up first. Your natural inclination will be to go with a larger stone but remember you have to move and work on it. To find a size you are comfortable working with.
Depth Is Important
Having the right depth is important for two reasons. First, for the birds to feel comfortable and to adequately take a bath, and secondly, for water retention. You want the Goldilocks depth. A depth that is just right for a wide range of birds. This can be accomplished by sloping. Having a gradual slope that leads to the deepest part, instead of just having a consistent depth.
Goldylocks
Having too shallow of a birdbath will not allow a bird to properly bathe themselves. Plus, it will require you to constantly fill the bath, either for bathing or for drinking.
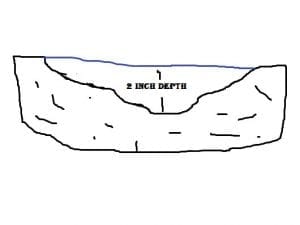
A depth I would shoot for would be at least a maximum of two inches at its deepest. Birds don’t like water that is much deeper than this and generally won’t use it for bathing but will drink from it.
I made the mistake of making mine originally only 1 1/2 inches deep at its deepest. A 2-inch depth is generally a good rule of thumb for birdbaths. The rock I used allowed me to create two bathing spots. A smaller one, more near the edge and the larger hole in the middle.
If you happen to make the bath too deep you can easily put some gravel or rocks in the bottom to lower the depth of the bath.
Steps
After putting on the required safety equipment.
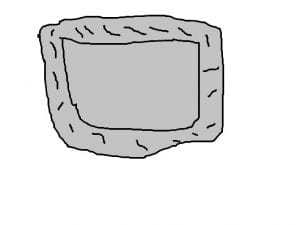
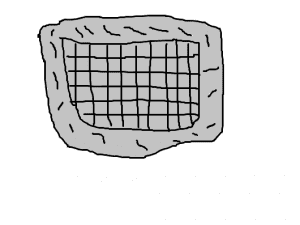
Take a marker and draw an outline of the shape of the bath you want. Keeping in mind, the dimensions of the rock and about having a ledge. I made my ledge about 1 1/2 wide.
Then take the angle grinder with a diamond blade attached to it and cut it into your marks. Plunging the blade as deep as it goes, all the while keeping in mind you want a gradual slope to the middle.
After that, you want to take the grinder and make vertical cuts from your outline to outline in about 1-inch swaths.
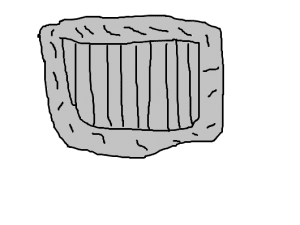
Next, you will want to make horizontal cuts, staying within your outline cuts making these also about 1-inch cuts.
Hammer Time
Take a hammer and insert the chisel into the gaps, then strike the chisel with the hammer. This should break apart the rock that is squared off by you cuts pretty easily, without much force exerted. Make sure you go as deep as you possibly can go, depending on the size of your angle grinder and diamond saw blade in the middle. I used a 4-inch grinder and blade and it took multiple times of making a grid pattern to get it to my liking. Try to get at least 2 inches deep in the middle.
Once you have gotten the rock to the appropriate depth, attach the diamond cup grinding wheel to your angle grinder. This is used to smooth out the bottom of the birdbath. I originally used the diamond saw blade to smooth out the bottom, but this was slightly more time-consuming. The diamond cup grinding wheel will really cut down on the time.
Having a smooth bottom surface is good for a couple of reasons. For looks and for cleaning. I usually just take a wire brush to clean out the bottom once every two weeks. As algae will grow on the bottom at times and this removes it pretty easily.
Now Where To Put It?
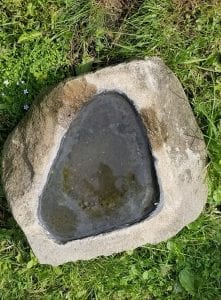
Place the rock where you want it and try to level it as much as possible. Either putting dirt or some small rocks under it to level it off.
You will have a one of a kind birdbath that will surely be unique.
Well, that is it, I really enjoyed making this project and the benefits of seeing the birds use it. I also get people in my backyard commenting about it and really liking it.
Have any questions or want to share your own birdbath creations. Would love to hear and see them. Thanks.
Share This: