The idea for this article came out of my own personal experience and PAIN!
Yep, pain. With this acquired wisdom, I now wish to share with the world, as best as I can, by posting a design and method to safely jump rope. To come up with a simple, relativity easy to build platform, that functions and reduces the amount of shock to feet and body.
Let’s jump right into it.
Oh, my Gawd…really? Yeah, I went there.
My Experience
In a serious all-in effort eight years ago, I embarked on a mission to get into shape, the best shape I have ever been in.
Weekend warrior beast mode!
I was tired of being husky and frumpy in my thirties. I had grown up rail-thin, no matter how much I ate I couldn’t put on weight, but once I hit my 30’s, the opposite happened. I couldn’t keep the weight off.
Workout Program That Works
Side note here: If you’re looking for a great diet and exercise program that also works, check out my review of Kinobody here, Is Kinobody A Scam? This guy just gets it right as it is a revolutionary way to lose weight and more importantly it works.
If you are an older individual looking to lose weight, I also highly recommend you check out my page Is Get Abs After 40 A Scam? or What Is Test Max Nutrition? Another great program specifically catered to older men.
So, what I did was devised a plan of lifting weights, a full-body workout condensed into 45 minutes. For example deadlifts, bench, presses, chin up, etc. Then immediately after that, I would jump rope for 30 minutes. In my garage on the hard cold gray concrete floor. I was reading on the internet that jumping rope was one of the best ways to burn the maximum amount of calories in the shortest amount of time.
Totally Sold On Jumping Rope
OKAY, I WAS SOLD on jump roping.
In a couple of months, I was down to 235 lbs. from a chunky 270 lbs. Jumping rope was hard work and it showed but…a problem presented itself to me.
The Problem…A Foot Problem…Plantar Fasciitis
A new problem, a foot problem. Pain in the feet problem. Bad pain.
Much to my surprise, whimpering victim noises came out of my mouth. Those two months of working my ass off worked but also killed my Plantar fascia tendon.
Why? Because I now had plantar fasciitis.
Hello, plantar fasciitis! You m*@!$% F*@!#$!!!!
Yes, It Is Super Painful!
Overweight plus jumping on concrete. Hmmm…Somehow I failed to see the correlation.
My foolish idiot self even continued to jump rope through this pain wanting to see more results, hoping the pain would go away.
I’ll just push through the pain. Wrong…
It didn’t btw. I had grown to love jumping rope as an amazing exercise. I had to also get comfortable with that pain for the next six months trying desperately to get rid of it.
Plantar fasciitis is the inflammation of the thick tendon that runs from the toes to the heel. It’s painful, believe me. People sometimes compare it to kidney stones or birth.
The Cure For Plantar Fasciitis
I quit jumping rope (eventually) after severely injuring my tendons and would need a long recovery until the pain disappeared, along with also some arch supports I bought at Wal-Mart.
These arch supports worked miracles on my feet. The exact arch support insert I used that got rid of my plantar fasciitis is Profoot Plantar Fasciitis Orthotics, Men’s 8-13, 1 Pair. It eliminated it in just a week of using them, for me after suffering for months. So, if you are already suffering try these, they worked for me.
So a combination of rest and arch support eventually got rid of it.
Avoidance
Now, it was years after this that, I read that you shouldn’t jump on concrete.
Wait…what?
Yeahhhhhhh.
The proverbial light bulb went off. Concrete + Jumping Rope = PAIN!!!
If I knew better, I would have done better. But ignorance was my friend in this case, and no lesson in life is free.
I read from one of the jump rope gurus that jumping rope on concrete will destroy your feet.
Amen brother, I can testify to that.
Other Surfaces To Jump Rope On
Anything to help lessen the impact on your feet and body, by all means, do it. Do not by any means disregard my warning and jump on the grey reaper of feet. You might get away with it for a while but probably not in the long run. Save your feet and put something cushioning underneath them.
Check out my post on Best Mats For Jumping Rope. If don’t want to mess around with building a platform, you can purchase a quality jumping mat instead. I review 4 of the best mats around.
Hard Surfaces
The problem with jumping rope is that the harder the surface the easier it is to jump rope. The rope slips easily off the hard surface, the force you exert to launch yourself upward is mostly transferred from the ground to upward movement, little is lost. I think jumping rope in the sand must be extremely difficult.
- Carpet
- Foam workout mats.
- Grass
- Dirt
- Wood floors
- Jump Rope Platform (see below)
Jump Rope Platform
Tools Needed
- A handful of 1 1/2 inch screws
- A handful of 1 3/4 inch screws
- 1 – Piece of 1/2 inch plywood or like I did 2- 2X8 1/2 inch plywood
- 4 – 2 X 4 (8 foot long)
- Hand Saw or Miter Saw
- Rechargeable Screwdriver
- Safety glasses
- Gloves
- Jigsaw, table saw (optional)
- Piece of rope
- Large drill bit 1/2 or larger
Now, I could just buy the foam workout mats you see at the sports store, but no…not good enough. I want the maximum amount of forgiveness for the least amount of chance of reactivating that old injury and the pain that comes along with it. Why? Because I miss the workout from jumping rope.
So, with some money and a trip to your hardware store or lumberyard, we will build a simple jump rope platform to help save our feet.
I had a framework of 2X4’s already that was 8 feet long and 43 wide. (seen below) I found these out of my Mom’s house and she wasn’t using them. But you can easily make your own frame pretty simply.
Side Note Time
A side note here the two middle pieces were 2X2’s or 2X3’s, as they didn’t touch the ground when the frame was laid down. I just worked with what I had. I thought maybe that this wouldn’t work out, but it did. It would also work out with 2X4’s in the middle as well. The 2X2’s gave a lot a flex in the middle too much. See below, I’ll fix that later.
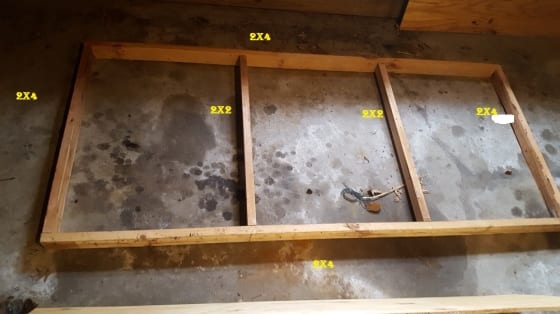
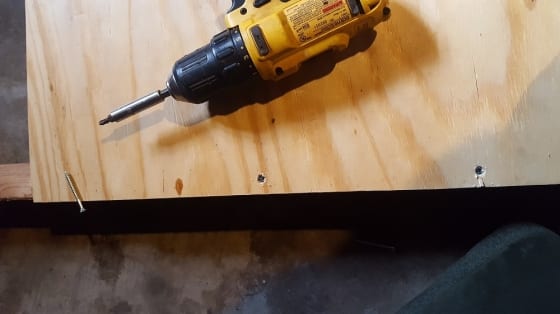
I bought 2 – 1/2 inch plywood 2′ X 8′ because I couldn’t fit a full sheet into the back of my Jeep Cherokee. I then started screwing in the 1 3/4 inch screws to attach the plywood to the frame. (seen below.
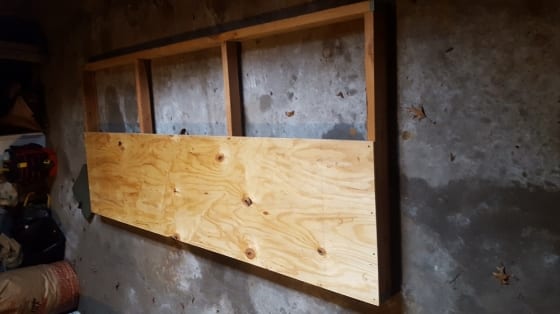
Screwed down every foot around the whole perimeter and the two inside 2X2’s.
I had overlap so I had to mark both ends and set up the table saw then sawed off the excess plywood. If you go with a full width of plywood you won’t have to do this, but I just worked with what I had already. I also tested it and it was too flimsy, the middle sagged too much. So, I put another 2X4 in the middle as shown below. I cut it a little longer then hammered it into place, for a nice tight fit. Then proceeded to screw in the ends and from the top through the plywood.

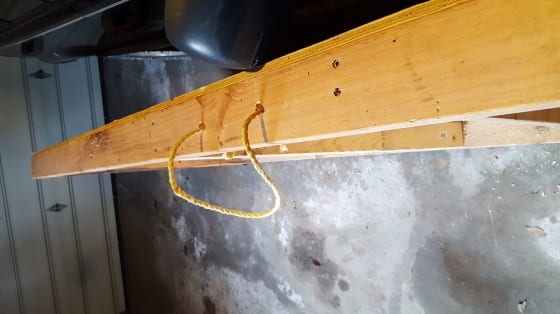
I was noticing it was getting hard to pick up the platform when the platform was lying flat on the ground, as my cuts left no handle hold. So, I drilled two holes, then stuck a piece of rope through and knotted both ends. Now, it is easy to pick up.
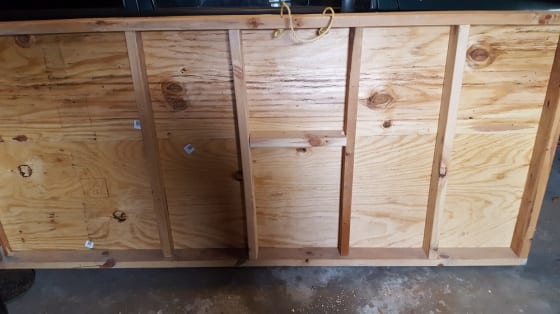
It was still a little too flimsy for my taste so I put a cross 2X4 in between one the 2×4 and the 2X2. This was nice and solid yet flexed just enough for my weight. I only put in one cross piece as I am only going to be jumping in the middle of this platform but you can add it anywhere you want. I also ran out of 2X4’s as well. I might strengthen this up later with more cross bracing. along the seam of the two pieces of plywood.
Finished Product laying flat down.
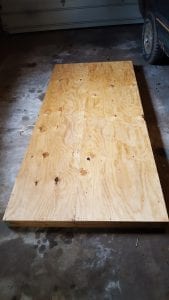
This is where I plan to store it up against the garage wall.

Other Tips
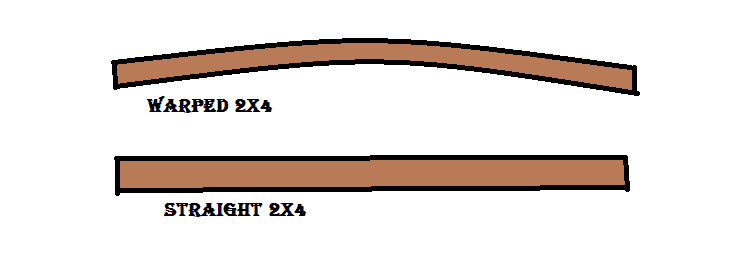
If the 2X4 are warped at all, maximize the cushioning support by placing them optimally where they will bend the most and flex in the middle of the platform. Use the material flaws in the materials to your advantage. I’m talking about a slight bend, not a whom pass 2X4, that would be hard to straighten enough to screw the plywood to. Simply eyeballing down the length of the 2X4 should reveal if there is warp-ness.
When building it, if you find it too flimsy add some bracing or a cross-section to stiffen things up depending on your weight. Wood is an easy material to work with and you can always find ways of strengthening it.
Make sure to countersink them screws deep enough or your jump rope might catch it or worse yet, you trip on it.
Take it slow when starting jump rope. Start at 5 to 10 minutes and build up slowly. Allow tendons and muscles adequate time to recover as well.
For the extra cushion, you could line glue foam mats to the top of the plywood or carpet.
Conclusion
I hope you like this platform example. I don’t claim to be a master carpenter or anything but it’s functional for my needs. I will amend it in the future I need to modify this platform. If you found something better than what I did, by all means, go with that. There is always a better way of doing something.
If you did find a better way, let me know in the comment section below.
Now, get jumping more safely folks.
Would love to hear any feedback, critiques or questions. Thanks!
Share This:
I was thinking about aluminium ,then plywood seeing your frame gave me to modelthanks
Wonderful! I think plywood would definitely be more forgiving on your feet and your wallet, as compared to aluminium. Let me know how it turns out.
Thanks for the great instructions and pics! So I’ve seen videos of people on these in boxing gyms, and built a small one (2′ x 4′) as I don’t have a garage and don’t have much space in my living room. I had the same problem as you – a lot of foot pain from jumping on concrete. And it really sucks that once you build up your endurance to jump for 30+ minutes, your joints just can’t handle it. The one I built is too small to jump comfortably so I’m going to give this a try. One question – I see you used 1/2″ plywood and was wondering if going thicker would be better, or if there’s a reason for 1/2″? I’m just worried it’ll flex so much that doing quick work and sprints/high knees wouldn’t be possible with that much bounce. Any insight you can give would be appreciated. Thanks!
Hey Joel,
I just went with 1/2″ plywood because I thought it would be stronger than 1/4″ plywood. I also thought 1/2″ would hold up longer than 1/4″. It very well might be better to go thicker with the plywood. I really don’t know, but wished I knew. I am happy with the 1/2″ after adding additional support on the underside of the plywood. Try a thicker plywood and see if you like it better. You can always change it in the future if you find you don’t like it.
Wood is a great material to work with, and you could easily add additional support underneath the plywood to accomplish this. Just by screwing in some additional 2X4s for extra bracing.
What I found was 1/2″ plywood at first was it was too bouncy and needed additional support. I added some support then tried it again till I got it where I liked it.
Hope this helps you Joel and please let me know what you decide and maybe even some pictures along with the results. As this might helps someone else too.
4ft x 8ft seems far larger than needed for this type of platform. What is the minimum size you would recommend?
4 ft x 8 ft is a little too big, but if you have the room it works. I would say about 3 1/2 to for 4 foot would be the minimum. Maybe less for some people, I really don’t know. I like not even thinking about if I don’t have enough room.
It does take up a lot of room the one I made, and there is a lot of space on the platform I don’t even use for sure. So, for sure it can be shortened lengthwise and maybe even widthwise. Plus it would easier to handle and store.
Your best bet would to get something similar in size (length) or measure out a distance on the floor and skip some rope to see how this would work for you and make adjustments before building a platform. Watching for the rope catching the front of the platform. Maybe even cut the plywood to 5 ft then place the plywood on the ground and jump some rope, then continue to reduce the size of the platform until you get the right size for yourself, without hitting the front of the platform with the jump rope.
Hope this helps Rob! If you do build something would love for some pictures and a description. This might help someone else out.